


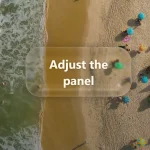
Liquid Glass Shader is a JavaScript implementation that creates an interactive liquid glass effect introduced in iOS 26.
It uses a WebGL fragment shader to apply a dynamic, lens-like distortion to a background image, which follows the user’s cursor across the page.
Liquid Glass Shader tracks cursor position and applies mathematical distortion calculations in real-time through GPU-accelerated shader programs.
This renders complex visual effects at 60fps by offloading computational work to the graphics pipeline rather than manipulating DOM elements or CSS properties.
The liquid glass effect follows your cursor with rounded box calculations, creating zones of varying distortion intensity that simulate light passing through curved glass surfaces.
Features:
- Fragment Shader Implementation: Uses custom GLSL shaders for GPU-accelerated rendering of light refraction and lens distortion effects.
- Multi-Layer Masking: Implements three distinct rounded box masks with configurable strength values for graduated distortion intensity.
- Texture Sampling & Blurring: Performs 9×9 grid texture sampling around distorted coordinates to create realistic blur and light diffusion.
- Gradient Lighting Calculations: Adds directional lighting based on cursor position to simulate light interaction with glass surfaces.
- Background Image Processing: Accepts any image source and applies real-time shader transformations without modifying the original asset.
See it in action:
How to use it:
1. Add the image source to your HTML document. The image needs the crossorigin attribute to prevent CORS issues when loading into WebGL textures.
<img
  id="sourceImage"
  crossorigin="anonymous"
  src="https://picsum.photos/1920/1080"
/>
2. Hide the source image with CSS since it only serves as the texture input:
img {
  display: none;
}
3. Create the canvas element that will display the shader output:
<canvas id="canvas"></canvas>
4. The fragment shader contains the mathematical logic for the glass effect. Add this shader code in a script tag with type x-shader/x-fragment:
<script id="fragShader" type="x-shader/x-fragment">
  precision mediump float;
  uniform vec3 iResolution;
  uniform float iTime;
  uniform vec4 iMouse;
  uniform sampler2D iChannel0;
  void mainImage(out vec4 fragColor, in vec2 fragCoord)
  {
    const float NUM_ZERO = 0.0;
    const float NUM_ONE = 1.0;
    const float NUM_HALF = 0.5;
    const float NUM_TWO = 2.0;
    const float POWER_EXPONENT = 6.0;
    const float MASK_MULTIPLIER_1 = 10000.0;
    const float MASK_MULTIPLIER_2 = 9500.0;
    const float MASK_MULTIPLIER_3 = 11000.0;
    const float LENS_MULTIPLIER = 5000.0;
    const float MASK_STRENGTH_1 = 8.0;
    const float MASK_STRENGTH_2 = 16.0;
    const float MASK_STRENGTH_3 = 2.0;
    const float MASK_THRESHOLD_1 = 0.95;
    const float MASK_THRESHOLD_2 = 0.9;
    const float MASK_THRESHOLD_3 = 1.5;
    const float SAMPLE_RANGE = 4.0;
    const float SAMPLE_OFFSET = 0.5;
    const float GRADIENT_RANGE = 0.2;
    const float GRADIENT_OFFSET = 0.1;
    const float GRADIENT_EXTREME = -1000.0;
    const float LIGHTING_INTENSITY = 0.3;
    vec2 uv = fragCoord / iResolution.xy;
    vec2 mouse = iMouse.xy;
    if (length(mouse) < NUM_ONE) {
      mouse = iResolution.xy / NUM_TWO;
    }
    vec2 m2 = (uv - mouse / iResolution.xy);
    float roundedBox = pow(abs(m2.x * iResolution.x / iResolution.y), POWER_EXPONENT) + pow(abs(m2.y), POWER_EXPONENT);
    float rb1 = clamp((NUM_ONE - roundedBox * MASK_MULTIPLIER_1) * MASK_STRENGTH_1, NUM_ZERO, NUM_ONE);
    float rb2 = clamp((MASK_THRESHOLD_1 - roundedBox * MASK_MULTIPLIER_2) * MASK_STRENGTH_2, NUM_ZERO, NUM_ONE) -
      clamp(pow(MASK_THRESHOLD_2 - roundedBox * MASK_MULTIPLIER_2, NUM_ONE) * MASK_STRENGTH_2, NUM_ZERO, NUM_ONE);
    float rb3 = clamp((MASK_THRESHOLD_3 - roundedBox * MASK_MULTIPLIER_3) * MASK_STRENGTH_3, NUM_ZERO, NUM_ONE) -
      clamp(pow(NUM_ONE - roundedBox * MASK_MULTIPLIER_3, NUM_ONE) * MASK_STRENGTH_3, NUM_ZERO, NUM_ONE);
    fragColor = vec4(NUM_ZERO);
    float transition = smoothstep(NUM_ZERO, NUM_ONE, rb1 + rb2);
    if (transition > NUM_ZERO) {
      vec2 lens = ((uv - NUM_HALF) * NUM_ONE * (NUM_ONE - roundedBox * LENS_MULTIPLIER) + NUM_HALF);
      float total = NUM_ZERO;
      for (float x = -SAMPLE_RANGE; x <= SAMPLE_RANGE; x++) {
        for (float y = -SAMPLE_RANGE; y <= SAMPLE_RANGE; y++) {
          vec2 offset = vec2(x, y) * SAMPLE_OFFSET / iResolution.xy;
          fragColor += texture2D(iChannel0, offset + lens);
          total += NUM_ONE;
        }
      }
      fragColor /= total;
      float gradient = clamp((clamp(m2.y, NUM_ZERO, GRADIENT_RANGE) + GRADIENT_OFFSET) / NUM_TWO, NUM_ZERO, NUM_ONE) +
        clamp((clamp(-m2.y, GRADIENT_EXTREME, GRADIENT_RANGE) * rb3 + GRADIENT_OFFSET) / NUM_TWO, NUM_ZERO, NUM_ONE);
      vec4 lighting = clamp(fragColor + vec4(rb1) * gradient + vec4(rb2) * LIGHTING_INTENSITY, NUM_ZERO, NUM_ONE);
      fragColor = mix(texture2D(iChannel0, uv), lighting, transition);
    } else {
      fragColor = texture2D(iChannel0, uv);
    }
  }
  void main() {
    mainImage(gl_FragColor, gl_FragCoord.xy);
  }
</script>
5. This script orchestrates everything. It sets up the WebGL context, compiles the shader, feeds it data, and runs the render loop.
 const canvas = document.getElementById("canvas");
  const gl = canvas.getContext("webgl");
  const img = document.getElementById("sourceImage");
  const setCanvasSize = () => {
    canvas.width = window.innerWidth;
    canvas.height = window.innerHeight;
  };
  setCanvasSize();
  const vsSource = `
        attribute vec2 position;
        void main() {
          gl_Position = vec4(position, 0.0, 1.0);
        }
      `;
  const fsSource = document.getElementById("fragShader").textContent;
  const createShader = (type, source) => {
    const shader = gl.createShader(type);
    gl.shaderSource(shader, source);
    gl.compileShader(shader);
    if (!gl.getShaderParameter(shader, gl.COMPILE_STATUS)) {
      console.error("Shader error:", gl.getShaderInfoLog(shader));
      gl.deleteShader(shader);
      return null;
    }
    return shader;
  };
  const vs = createShader(gl.VERTEX_SHADER, vsSource);
  const fs = createShader(gl.FRAGMENT_SHADER, fsSource);
  const program = gl.createProgram();
  gl.attachShader(program, vs);
  gl.attachShader(program, fs);
  gl.linkProgram(program);
  gl.useProgram(program);
  const buffer = gl.createBuffer();
  gl.bindBuffer(gl.ARRAY_BUFFER, buffer);
  gl.bufferData(
    gl.ARRAY_BUFFER,
    new Float32Array([-1, -1, 1, -1, -1, 1, 1, 1]),
    gl.STATIC_DRAW
  );
  const position = gl.getAttribLocation(program, "position");
  gl.enableVertexAttribArray(position);
  gl.vertexAttribPointer(position, 2, gl.FLOAT, false, 0, 0);
  const uniforms = {
    resolution: gl.getUniformLocation(program, "iResolution"),
    time: gl.getUniformLocation(program, "iTime"),
    mouse: gl.getUniformLocation(program, "iMouse"),
    texture: gl.getUniformLocation(program, "iChannel0"),
  };
  let mouse = [0, 0];
  canvas.addEventListener("mousemove", (e) => {
    mouse = [e.clientX, canvas.height - e.clientY];
  });
  const texture = gl.createTexture();
  const setupTexture = () => {
    gl.pixelStorei(gl.UNPACK_FLIP_Y_WEBGL, true);
    gl.bindTexture(gl.TEXTURE_2D, texture);
    gl.texImage2D(
      gl.TEXTURE_2D,
      0,
      gl.RGBA,
      gl.RGBA,
      gl.UNSIGNED_BYTE,
      img
    );
    gl.texParameteri(gl.TEXTURE_2D, gl.TEXTURE_MIN_FILTER, gl.LINEAR);
    gl.texParameteri(gl.TEXTURE_2D, gl.TEXTURE_WRAP_S, gl.CLAMP_TO_EDGE);
    gl.texParameteri(gl.TEXTURE_2D, gl.TEXTURE_WRAP_T, gl.CLAMP_TO_EDGE);
  };
  if (img.complete) {
    setupTexture();
  } else {
    img.onload = setupTexture;
  }
  const startTime = performance.now();
  const render = () => {
    const currentTime = (performance.now() - startTime) / 1000;
    gl.viewport(0, 0, canvas.width, canvas.height);
    gl.clear(gl.COLOR_BUFFER_BIT);
    gl.uniform3f(uniforms.resolution, canvas.width, canvas.height, 1.0);
    gl.uniform1f(uniforms.time, currentTime);
    gl.uniform4f(uniforms.mouse, mouse[0], mouse[1], 0, 0);
    gl.activeTexture(gl.TEXTURE0);
    gl.bindTexture(gl.TEXTURE_2D, texture);
    gl.uniform1i(uniforms.texture, 0);
    gl.drawArrays(gl.TRIANGLE_STRIP, 0, 4);
    requestAnimationFrame(render);
  };
  window.addEventListener("resize", setCanvasSize);
  render();
FAQs
Q: Can I adjust the size and shape of the glass distortion area?
A: The distortion shape comes from the POWER_EXPONENT constant in the fragment shader. Values above 6.0 make the mask more rectangular, while values between 2.0 and 4.0 create rounder, more elliptical shapes. The size scales with the MASK_MULTIPLIER constants. Decrease these values (try 5000.0 instead of 10000.0) to enlarge the distortion area, or increase them for a smaller, more concentrated effect. Keep the three multipliers relatively close to maintain smooth mask transitions.
Q: Can I apply this effect to DOM elements instead of a background image?
A: WebGL textures require image data, not DOM elements. Capture DOM content using html2canvas or similar libraries to generate an image, then pass that image to the shader. This approach works for static captures but creates performance issues for animated content. The conversion process introduces latency that prevents real-time updates. For glass effects on live DOM content, CSS backdrop-filter remains more practical despite its limitations.
Q: What happens to performance with high-resolution images?
A: The fragment shader executes once per output pixel, not per source image pixel. A 4K canvas renders the same number of shader invocations whether the source image is 1080p or 8K. Resolution affects texture sampling speed and memory bandwidth, but the impact stays minimal until you exceed GPU texture size limits (typically 4096×4096 or 8192×8192). The blur loop’s 81 samples per pixel creates the main performance cost. Reduce SAMPLE_RANGE to 3.0 for a 7×7 grid (49 samples) if you need better performance on older hardware.
Q: How do I customize the lighting direction and color?
A: The gradient calculation in the shader determines lighting direction. The current implementation creates top-lit effects with m2.y in the gradient formula. Swap m2.y with m2.x to change the lighting to left-right orientation, or use combinations like m2.x + m2.y for diagonal lighting. Color adjustments require modifying the lighting calculation that adds vec4(rb1) and vec4(rb2). Replace these with colored vec4 values like vec4(rb1 * 0.8, rb1 * 0.9, rb1 * 1.0, 1.0) to shift toward blue tones. The LIGHTING_INTENSITY constant scales the overall brightness.
Related Resources:
See Also:
 WebGL Liquid Glass Effect for HTML Elements – LiquidGlass.js
 Create Liquid Glass Effects with Dynamic Displacement – GlassiFy
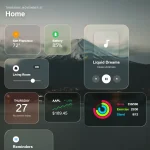 Create Realistic iOS Liquid Glass Effects with SVG Filters and JS (Web Component)
 Create Realistic Liquid Glass UI with RealGlass Library
 Create Advanced Liquid Glass & Noise Effects with FxFilterJS
 iOS 26 Liquid Glass Effects for Vanilla/React/Vue – Liquid-Web
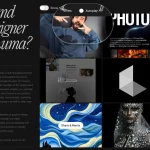 Draggable Liquid Glass Effect with JavaScript and SVG Filters
 Realistic Liquid Glass Distortion Effects with CSS and SVG