


Liquid-Web is a JavaScript library that creates interactive, customizable liquid glass effects introduced in Apple iOS 26.
Features:
- Cross-framework compatibility (Vue, React, Vanilla JS)
- Four distinct glass effect modes: standard, polar, prominent, and shader
- Customizable intensity controls for scale, blur, saturation, and aberration
- Event system with lifecycle hooks
- Instance management and static methods for programmatic control
- Real-time effect updates without re-initialization
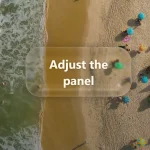
See it in action:
How to use it:
1. Install and import Liquid-Web into your project.
# NPM
$ npm install liquid-web
// Vanilla JavaScript
import { LiquidWeb } from 'liquid-web';
// Vue
import { LiquidWeb } from 'liquid-web/vue';
// React
import { LiquidWeb } from './dist/react/index.mjs';
2. Or just drop the CDN link into your HTML file:
<script src="https://cdn.jsdelivr.net/npm/liquid-web/liquid-core.min.js"></script>
3. For a plain HTML/JS project, you target an element with a selector.
<div data-liquid>
  <button>I am liquid button!</button>
</div>
new LiquidWeb('[data-liquid]', {
  // options here
});
4. Vue implementation.
<script setup lang="ts">
  import { LiquidWeb } from 'liquid-web/vue';
</script>
<template>
  <LiquidWeb
    :options="{ /* options here */ }"
    :selector="div"
    @click="(instance) => console.log('Clicked!', instance)"
    @mouseEnter="(instance) => console.log('Mouse entered!', instance)"
    @mouseLeave="(instance) => console.log('Mouse left!', instance)"
  >
    <button>I am liquid button!</button>
  </LiquidWeb>
</template>
5. React implementation.
import { LiquidWeb } from './dist/react/index.mjs';
export default () => {
  return (
    <div>
      <LiquidWeb
        options={{ /* options here */ }}
        selector="div"
        onClick={(instance) => console.log('Clicked!', instance)}
        onMouseEnter={(instance) => console.log('Mouse entered!', instance)}
        onMouseLeave={(instance) => console.log('Mouse left!', instance)}
      >
        <button>I am liquid button!</button>
      </LiquidWeb>
    </div>
  );
};
6. All possible options to configure the liquid glass effect:
el?(string | HTMLElement): The element selector to apply the liquid effect to.init?(boolean, default:true): Determines if the effect should initialize immediately on load. Set tofalsefor manual initialization.scale?(number, default:22): Controls the intensity of the displacement effect. Higher values create more distortion.blur?(number | string, default:2): Sets the intensity of the blur effect.saturation?(number | string, default:170): Adjusts the color saturation level of the effect.aberration?(number, default:50): Controls the intensity of the chromatic aberration effect.mode?('standard' | 'polar' | 'prominent' | 'shader', default:'standard'): Toggles between different pre-configured glass effect styles.on?(LiquidWebEventListeners): An object containing event listeners to attach at initialization.events?(LiquidWebEventListeners): An alias for theonoption.onAny?(LiquidWebEventCallback): A single callback function that fires for any event.
7. Available events. These events can be configured during initialization or attached afterward:
beforeInit: Fires just before the effect is initialized.init: Fires when the effect is initialized. Note: when using the.on()method, this only works if you setinit: falsefirst.afterInit: Fires immediately after the effect is initialized.beforeDestroy: Fires before the effect is destroyed.destroy: Fires when the effect is destroyed.afterDestroy: Fires after the effect is destroyed.beforeUpdate: Fires before the effect’s properties are updated.update: Fires when the effect’s properties are updated.afterUpdate: Fires after the effect’s properties are updated.beforeUpdateEffects: Fires before the visual effects are recalculated.updateEffects: Fires when the visual effects are recalculated.afterUpdateEffects: Fires after the visual effects are recalculated.mouseEnter: Fires when the mouse pointer enters the element.mouseLeave: Fires when the mouse pointer leaves the element.mouseMove: Fires when the mouse pointer moves over the element.mouseDown: Fires when a mouse button is pressed down on the element.mouseUp: Fires when a mouse button is released over the element.click: Fires when the element is clicked.
// During initialization
const liquid = new LiquidWeb('[data-liquid]', {
  on: {
    init: (instance) => console.log('Effect ready'),
    mouseEnter: (instance) => instance.update({ scale: 35 }),
    mouseLeave: (instance) => instance.update({ scale: 22 })
  }
});
// Post-initialization
liquid.on('click', (instance) => {
  // Custom click handling
});
8. Static methods:
// Get all active instances
const instances = LiquidWeb.__instances__;
// Initialize on specific element
LiquidWeb.init(document.querySelector('.my-element'));
// Retrieve existing instance
const instance = LiquidWeb.getInstance('[data-liquid]');
// Alternative: element.liquidWeb
See Also:
 WebGL Liquid Glass Effect for HTML Elements – LiquidGlass.js
 Create Liquid Glass Effects with Dynamic Displacement – GlassiFy
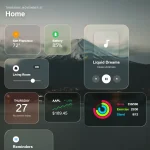 Create Realistic iOS Liquid Glass Effects with SVG Filters and JS (Web Component)
 WebGL-Powered iOS-Style Liquid Glass Effects for JavaScript
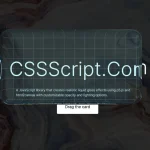 Create Realistic Liquid Glass UI with RealGlass Library
 Create Advanced Liquid Glass & Noise Effects with FxFilterJS
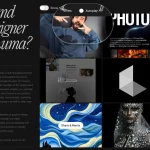 Draggable Liquid Glass Effect with JavaScript and SVG Filters
 Realistic Liquid Glass Distortion Effects with CSS and SVG