


super-toastr is a Vanilla JavaScript library to create customizable stacked toast notifications where the users are able to switch between toast message by clicking the next/prev arrows.
How to use it:
1. Install the package and import the super-toastr as an module.
# Yarn
$ yarn add super-toastr
# NPM
$ npm install super-toastr --save
import { createToaster } from `super-toastr`;2. Or include the super-toastr.bundle.js on the webpage.
<script src="dist/super-toastr.bundle.js"></script>
3. Create a container to hold the toast notifications.
<div id="toasts-container-example" style="z-index: 999999; pointer-events: none; display: flex; position: fixed; top: 0; left: 0; width: 100%; height: 100%;">
</div>
4. Initialize the super-toastr library and we’re ready to go.
var instance = SuperToastrLib.createToaster('toasts-container-example');5. Create a custom toast notification on the page.
// configs
var toastConfig = {
    "type": "SUC", // "WAR", "ERR", "INF"
    "position": "top_center", // "top_right", "top_left", "bottom_center", "bottom_right", "bottom_left"
    "background": "white",
    "minWidth": "250px"
    "content": "<div style=\"color: darkblue; font-weight: bold; padding-bottom: 5px;\">Toast Title</div><div style=\"color: darkblue;\">One toastr to rule them all</div>",
    "closeBtn": true
}
// push the toast
instance.addToast(toastConfig);
6. The example CSS for the navigation arrows.
#previous-arrow {
  display: inline-block;
  width: 30px;
  height: 30px;
  border: 2px solid black;
  border-radius: 50%;
  margin-right: 5px;
}
#previous-arrow:after {
  content: '';
  display: inline-block;
  width: 10px;
  height: 10px;
  margin-left: 9px;
  margin-top: 6px;
  border-top: 4px solid black;
  border-right: 4px solid black;
  -moz-transform: rotate(-135deg);
  -webkit-transform: rotate(-135deg);
  transform: rotate(-135deg);
}
#previous-arrow:hover {
  border: 2px solid #d1d1d1;
}
#previous-arrow:hover::after {
  border-top: 4px solid #d1d1d1;
  border-right: 4px solid #d1d1d1;
}
#next-arrow {
  display: inline-block;
  width: 30px;
  height: 30px;
  border: 2px solid black;
  border-radius: 50%;
  margin-left: 5px;
}
#next-arrow:after {
  content: '';
  display: inline-block;
  width: 10px;
  height: 10px;
  margin-right: 25px;
  margin-top: 6px;
  margin-left: -3px;
  border-bottom: 4px solid black;
  border-left: 4px solid black;
  -moz-transform: rotate(-135deg);
  -webkit-transform: rotate(-135deg);
  transform: rotate(-135deg);
}
#next-arrow:hover {
  border: 2px solid #d1d1d1;
}
#next-arrow:hover::after {
  border-bottom: 4px solid #d1d1d1;
  border-left: 4px solid #d1d1d1;
}
7. Go to prev/next toast notification manually.
instance.nextToast();
instance.previousToast();
8. Remove a toast notification by ID.
instance.removeToastById(ToastId);
9. Remove toast notifications by Type.
instance.removeAllToastTypes(array of types);
10. Remove all activated toast notifications.
instance.removeAllToasts();
See Also:
 Sonner-Style Stacked Toast Notifications in JavaScript – Toastry
 Framework-Agnostic Toast Notifications with TypeScript – NotifyX
 Advanced Toast/Tooltip/Popover/Confirm/Modal Notification Library – toast-anchor
 Developer-Friendly Toast Alerts in JavaScript – Toast-JS
 Modern Toast Popup JavaScript Library – EggyJS
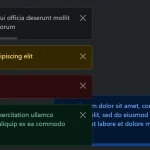 Advanced Alert Notification System For Bootstrap 5 – AvalynxAlert.js
 SVG Gooey Toast Notification Library – Physics Toast
 Modern JavaScript Toast Notification & Modal Popup Library – JSPT