


A simple yet fully customizable JS & CSS image slider which comes with a subtle slice transition effect between slides.
How to use it:
Load the js-image-slider.js into your web page.
<script src="js/js-image-slider.js"></script>
Embed a series of images into the web page as follows.
<div id="slider">
  <a href="#"><img src="1.jpg" alt="Image Caption 1"></a>
  <a href="#"><img src="2.jpg" alt="Image Caption 2"></a>
  <a href="#"><img src="3.jpg" alt="Image Caption 3"></a>
  ...
</div>
The required CSS styles for the image slider.
#slider {
  width: 700px;
  height: 306px;/* Make it the same size as your images */
  background: #fff url(loading.gif) no-repeat 50% 50%;
  position: relative;
  margin: 0 auto;/*make the image slider center-aligned */
  box-shadow: 0px 1px 5px #999999;
}
#slider img {
  position: absolute;
  border: none;
  display: none;
}
/* the link style (if an image is wrapped in a link) */
#slider a.imgLink {
  z-index: 2;
  display: none;
  position: absolute;
  top: 0px;
  left: 0px;
  border: 0;
  padding: 0;
  margin: 0;
  width: 100%;
  height: 100%;
}
/* Caption styles */
div.mc-caption-bg,
div.mc-caption-bg2 {
  position: absolute;
  width: 100%;
  height: auto;
  padding: 0;
  left: 0px;
  bottom: 15px;
  z-index: 3;
  overflow: hidden;
  font-size: 0;
}
div.mc-caption-bg { background-color: black; }
div.mc-caption {
  font: bold 14px/20px Arial;
  color: #EEE;
  z-index: 4;
  padding: 10px 0;
  text-align: center;
}
div.mc-caption a { color: #FB0; }
div.mc-caption a:hover { color: #DA0; }
/* ------ built-in navigation bullets wrapper ------*/
div.navBulletsWrapper {
  top: 320px;
  left: 280px; /* Its position is relative to the #slider */
  width: 150px;
  background: none;
  padding-left: 20px;
  position: relative;
  z-index: 5;
  cursor: pointer;
}
/* each bullet */
div.navBulletsWrapper div {
  width: 11px;
  height: 11px;
  background: transparent url(images/bullet.png) no-repeat 0 0;
  float: left;
  overflow: hidden;
  vertical-align: middle;
  cursor: pointer;
  margin-right: 11px;/* distance between each bullet*/
  _position: relative;/*IE6 hack*/
}
div.navBulletsWrapper div.active { background-position: 0 -11px; }
That’s it. Here’re several options to customize the image slider.
// slider wrappersliderId: "slider",
sliderId: "slider",
// series1 or series2
effect: "series1",
// random transition effects
effectRandom: false,
// animation time
pauseTime: 2600,
transitionTime: 500,
// slice transition effect
slices: 12,
boxes: 8,
// pause on mouse over
hoverPause: true,
autoAdvance: true,
// image caption options
captionOpacity: 0.3,
captionEffect: "fade",
thumbnailsWrapperId: "thumbs",
m: false,
license: "mylicense"
See Also:
 Lightweight Image Slider With Slide/Fade Transitions – SliderJS
 Pure CSS Image Slider With Thumbnail Navigation
 Basic Pure CSS Image Slider – slider.css
 Pure JS / CSS Image Slider With A Masking Effect
 Full Width Responsive Image Slider with JavaScript – Gallry.js
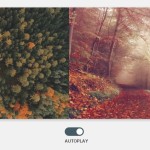 Automatic Image Slider with Pure CSS
 Super Simple Image Slider In Vanilla JavaScript – Vanilla Slider
 Fullscreen 3D Cube Slider with Pure CSS / CSS3
excellent, works smoothly on my computer and my android phone. Thank you very much