


This is a simple, responsive, mobile-friendly slider carousel created with vanilla JavaScript and CSS/CSS3. It displays three slides on widescreen devices and a single slide on small screens.
The active slide appears in the center at full scale while adjacent slides display at reduced size with fade effects. As you hover over the carousel, the cursor transforms into directional arrows based on position, and clicks trigger smooth transitions between slides.
The slider carousel also supports touch interactions on mobile devices. You can navigate between slides by tapping the left or right sides of the screen on touch devices.
See It In Action:
How to use it:
1. Build the HTML Structure for the Carousel Slider:
<div class="slider-container">
  <div class="slider">
  </div>
</div>
2. Create an empty element for the custom cursor:
<div class="custom-cursor"></div>
3. Add the following JavaScript code to your project. Don’t forget to replace the image paths with your own images.
The Slider class handles all the functionality. The constructor initializes the slider, gets the necessary DOM elements, sets the slide width, and defines the image URLs. It then calls init().
The init() method calls three other key methods:
createSlides(): This generates the HTML for each slide. It creates three times the number of images. This duplication is what enables the infinite scrolling effect.setupEventListeners(): This sets up event listeners for mouse and touch interactions. It also handles window resizing.positionSlides(): This method calculates the position of each slide. It applies a CSS transform to move the slides. It also adds or removes the active class on the current slide.
The moveSlides(direction) method is the core of the animation. It takes a direction parameter (-1 for left, 1 for right). It updates the currentIndex and calls positionSlides() to trigger the visual shift. The code includes a check to reset the slider’s position for infinite looping. This prevents the slider from running out of slides.
The startAutoplay() and stopAutoplay() methods control the automatic sliding. startAutoplay sets an interval that calls moveSlides(1) every 3 seconds. stopAutoplay clears this interval.
The event listeners for mouseenter and mouseleave on the container control autoplay. Autoplay pauses when the mouse is over the slider and resumes when it leaves. The click event listener on the container calls moveSlides based on the click position.
The mousemove event listener updates the position of the custom-cursor element. It also adds the left or right class to change the cursor’s appearance.
class Slider {
  constructor() {
    this.container = document.querySelector('.slider-container');
    this.slider = document.querySelector('.slider');
    this.cursor = document.querySelector('.custom-cursor');
    this.slideWidth = 420; // 400px + 20px margin
    // Override images here
    this.images = [
      "1.jpg",
      "2.jpg",
      "3.jpg",
      "4.jpg",
      "5.jpg"
    ];
    this.currentIndex = 0;
    this.isAnimating = false;
    this.init();
  }
  init() {
    this.createSlides();
    this.setupEventListeners();
    this.positionSlides();
    this.startAutoplay();
  }
  createSlides() {
    const totalSlides = this.images.length * 3;
    for (let i = 0; i < totalSlides; i++) {
      const index = i % this.images.length;
      const slide = document.createElement('div');
      slide.className = 'slide';
      slide.innerHTML = `<img src="${this.images[index]}" alt="Slide ${index + 1}">`;
      this.slider.appendChild(slide);
    }
  }
  positionSlides() {
    const slides = this.slider.querySelectorAll('.slide');
    const offset = (this.container.offsetWidth - this.slideWidth) / 2;
    const baseTransform = -this.currentIndex * this.slideWidth + offset;
    this.slider.style.transform = `translateX(${baseTransform}px)`;
    slides.forEach((slide, index) => {
      const normalizedIndex = this.normalizeIndex(index);
      slide.classList.toggle('active', normalizedIndex === this.currentIndex % this.images.length);
    });
  }
  normalizeIndex(index) {
    return index % this.images.length;
  }
  moveSlides(direction) {
    if (this.isAnimating) return;
    this.isAnimating = true;
    const slides = this.slider.querySelectorAll('.slide');
    this.currentIndex += direction;
    this.slider.style.transition = 'transform 0.3s ease-out';
    this.positionSlides();
    if (this.currentIndex >= this.images.length * 2 || this.currentIndex <= this.images.length - 1) {
      setTimeout(() => {
        this.slider.style.transition = 'none';
        this.currentIndex = this.currentIndex >= this.images.length * 2 ?
          this.currentIndex - this.images.length :
          this.currentIndex + this.images.length;
        this.positionSlides();
      }, 300);
    }
    setTimeout(() => {
      this.isAnimating = false;
    }, 300);
  }
  setupEventListeners() {
    document.addEventListener('mousemove', (e) => {
      this.cursor.style.left = `${e.clientX - 25}px`;
      this.cursor.style.top = `${e.clientY - 25}px`;
      const rect = this.container.getBoundingClientRect();
      const isLeft = e.clientX < rect.left + rect.width / 2;
      this.cursor.classList.toggle('left', isLeft);
      this.cursor.classList.toggle('right', !isLeft);
    });
    this.container.addEventListener('mouseenter', () => {
      this.cursor.style.opacity = '1';
      this.stopAutoplay();
    });
    this.container.addEventListener('mouseleave', () => {
      this.cursor.style.opacity = '0';
      this.startAutoplay();
    });
    this.container.addEventListener('click', (e) => {
      const rect = this.container.getBoundingClientRect();
      const isLeft = e.clientX < rect.left + rect.width / 2;
      this.moveSlides(isLeft ? -1 : 1);
      this.cursor.classList.add('active');
      setTimeout(() => this.cursor.classList.remove('active'), 300);
    });
    window.addEventListener('resize', () => this.positionSlides());
  }
  startAutoplay() {
    this.stopAutoplay();
    this.autoplayInterval = setInterval(() => {
      this.moveSlides(1);
    }, 3000);
  }
  stopAutoplay() {
    if (this.autoplayInterval) {
      clearInterval(this.autoplayInterval);
    }
  }
}
// Initialize
document.addEventListener('DOMContentLoaded', () => {
  new Slider();
});
4. Include these CSS styles in your project to style the carousel:
.slider-container {
  width: 1200px;
  position: relative;
  overflow: hidden;
}
.slider {
  display: flex;
  position: relative;
}
.slide {
  min-width: 400px;
  height: 400px;
  margin: 0 10px;
  position: relative;
  transform: scale(0.8);
  opacity: 0.6;
  transition: all 0.3s ease-in-out;
  border-radius: 10px;
  overflow: hidden;
  flex-shrink: 0;
}
.slide.active {
  transform: scale(1);
  opacity: 1;
}
.slide img {
  width: 100%;
  height: 100%;
  object-fit: cover;
}
.custom-cursor {
  width: 50px;
  height: 50px;
  background: rgba(255, 255, 255, 0.2);
  border: 2px solid white;
  border-radius: 50%;
  position: fixed;
  pointer-events: none;
  display: flex;
  justify-content: center;
  align-items: center;
  color: white;
  font-size: 20px;
  opacity: 0;
  transition: transform 0.1s ease;
  backdrop-filter: blur(4px);
  z-index: 1000;
}
.custom-cursor.left::before {
  content: "←";
}
.custom-cursor.right::before {
  content: "→";
}
.custom-cursor.active {
  transform: scale(1.5);
}
FAQs
Q: Can I use this with a different number of slides?
A: Yes. Change the images array in the JavaScript code to include your image URLs. The script automatically adapts to the number of images you provide.
Q: How do I change the slide transition speed?
A:Modify the transition property in the CSS for the .slider class. For example, transition: transform 0.5s ease-out; would make the transition take 0.5 seconds.
Q: Can I disable autoplay?
A: Yes. Remove or comment out the this.startAutoplay(); line in the init() method.
Q: How can I change slide dimensions?
A: Adjust this.slideWidth = 420 in Javascript and .slide class styles in CSS. Modify those values as needed.
Q: Is it possible add text in slides?
A: Yes. Add text to the slide.innerHTML property within the createSlides() method.
See Also:
 Touch-Ready, High-Performance Vanilla JS Slider – Pagiflow
 Create Modern Mobile-friendly Carousels With Slickless.js
 Lightweight Vanilla JS Carousel with Touch Support – Driftbox
 Lightweight Bootstrap 5 Card Slider – AvalynxCardSlider
 Infinite Scrolling Carousel with Momentum Physics – Grab-n-Drag Infinite Carousel
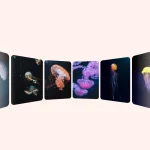 Lightweight Pure CSS 3D Carousel with Fade in/out Effects
 Tiny Touch Carousel Web Component for Modern Apps – Pure Swipe Slider
 Fast, Extensible, Touch-enabled Carousel & Slider JS Library – Smooothy