


Quercus.js is a dependency-free JavaScript library that renders hierarchical data structures as an interactive, navigable tree structure.
Named after the botanical genus for oak trees, this library transforms your nested JSON data into expandable treeviews with built-in search, selection controls, and smooth animations.
Features:
- Zero Dependencies: Runs entirely on vanilla JavaScript with no external libraries required, keeping your bundle size minimal.
- Hierarchical Data Rendering: Converts nested JSON objects into interactive tree structures with automatic parent-child relationship handling.
- Built-in Search Functionality: Filters tree nodes based on search terms with automatic parent expansion and a clear button to reset filtering.
- Flexible Selection Modes: Supports both single-node and multi-node selection with optional cascading selection that automatically selects or deselects child nodes.
- Checkbox Integration: Displays checkboxes for intuitive selection control, positioned between expander icons and node labels.
- Programmatic API: Provides methods to select or deselect nodes by ID, perform searches, and update tree data after initialization.
- Custom Node Rendering: Offers an onRenderNode callback for complete control over node content display, including custom icons and status indicators.
- Global Control Buttons: Optional controls for selecting all nodes, inverting selection, or expanding and collapsing the entire tree at once.
- Granular Selectability: Allows you to disable selection for individual nodes, useful for category headers or root nodes that shouldn’t be interactive.
Use Cases:
- File or Folder Navigation: The most classic use case. You can build a file explorer interface for a content management system or a web application, using
selectable: falsefor root nodes or folders that shouldn’t be selected. - Permission and Role Management: We could see this being used in an admin dashboard to assign permissions. With
checkboxSelectionEnabledandcascadeSelectChildren, an admin could check a parent role and automatically grant all the nested permissions below it. - E-commerce Category Filtering: Imagine a product filter where categories have multiple sub-categories. Quercus.js can display this hierarchy, and users can select multiple categories to narrow down their search. The built-in search is a huge plus here.
- Displaying Organizational Charts: You can represent a company’s structure. The
onRenderNodecallback is perfect for this, as you could add employee photos, titles, or other custom information directly into the node’s HTML.
How to use it:
1. Install & download with NPM.
# NPM
$ npm install quercus.js
2. Add references to the treeview.js and treeview.css files in your project.
<link rel="stylesheet" href="path/to/src/treeview.css">
<script src="path/to/src/treeview.js"></script>
3. Create a container element with a unique ID where the tree will be rendered.
<div id="myTreeview"></div>
4. Quercus.js expects an array of objects where each object represents a tree node. Nodes can contain a children array to create nested structures:
- id (string, optional): A unique identifier required for programmatic selection using the selectNodeById method.
- name (string, optional): The display text for the node, used in both rendering and search functionality. Can be customized using the nodeNameKey option.
- children (array, optional): An array of child node objects that creates the nested tree structure.
- selected (boolean, optional): When set to true, the node appears selected on initial render.
- selectable (boolean, optional): Setting this to false prevents the node from being selected, useful for headers or category labels.
const treeData = [
  {
    id: '1',
    name: 'JavaScript',
    selectable: false,
    children: [
      {
        id: '1.1',
        name: 'React',
        children: [
          {id: '1.1.1', name: 'React.js'},
          {id: '1.1.2', name: 'React Native', selected: true}
        ]
      },
      {
        id: '1.2',
        name: 'Vue',
        children: [
          {id: '1.2.1', name: 'Vite'},
          {id: '1.2.2', name: 'Nuxt'}
        ]
      }
    ]
  },
  {
      id: '2',
      name: 'HTML',
      children: [
        {id: '2.1', name: 'HTML5'},
        {id: '2.2', name: 'XML'}
      ]
  },
  {id: '3', name: 'CSS'}
  // ... more data here
];
5. Create a new Treeview instance and pass in configuration options.
containerId: (string) Required. The ID of the HTMLdivelement where the treeview will be rendered.nodeNameKey: (string) The key in your data object to use for the node’s label. Defaults toname.data: (Array<object>) The array of node objects representing your hierarchical data.searchEnabled: (boolean) Iftrue, a search input field will be rendered above the treeview.searchPlaceholder: (string) Placeholder text for the search field. Defaults toSearch tree....initiallyExpanded: (boolean) Iftrue, all nodes will be expanded on initial load.multiSelectEnabled: (boolean) Iftrue, users can select multiple nodes. Iffalse, only a single node can be selected at a time.onSelectionChange: (function) A callback function that executes whenever the selection changes. It receives an array of all currently selected node data objects.onRenderNode: (function) A callback for custom node rendering. It receives the node’s data and the HTML element to populate.showSelectAllButton: (boolean) Iftrue, a “Select All” / “Deselect All” button is displayed. RequiresmultiSelectEnabled,nodeSelectionEnabled, andcheckboxSelectionEnabledto betrue.showInvertSelectionButton: (boolean) Iftrue, an “Invert Selection” button is displayed.showExpandCollapseAllButtons: (boolean) Iftrue, “Expand All” and “Collapse All” buttons are displayed.nodeSelectionEnabled: (boolean) Iftrue, nodes can be selected. Iffalse, selection is disabled.cascadeSelectChildren: (boolean) Iftrue, selecting a parent node will also select all of its children.checkboxSelectionEnabled: (boolean) Iftrue, a checkbox will be displayed next to each node for selection.
const tree = new Treeview({
  containerId: 'myTreeview',
  data: treeData,
  searchEnabled: false,
  searchPlaceholder: 'Search tree...',
  initiallyExpanded: false,
  multiSelectEnabled: false,
  onSelectionChange: null,
  onRenderNode: null,
  showSelectAllButton: false,
  showInvertSelectionButton: false,
  showExpandCollapseAllButtons: false,
  nodeSelectionEnabled: true,
  cascadeSelectChildren: false,
  checkboxSelectionEnabled: false,
  nodeNameKey: 'name'
});
6. The onRenderNode callback gives you complete control over node content. This callback receives two parameters: the node data object and a DOM element to populate. The expander icon gets added automatically by the library if the node has children.
Here’s an example that adds custom icons and status information:
const tree = new Treeview({
  containerId: 'myTreeview',
  data: treeData,
  onRenderNode: (nodeData, nodeContentWrapper) => {
    // Clear existing content for setData calls
    nodeContentWrapper.innerHTML = '';
    // Add custom icon based on node type
    const icon = document.createElement('span');
    icon.classList.add('custom-icon');
    if (nodeData.type === 'folder') {
      icon.textContent = '📁';
    } else if (nodeData.type === 'file') {
      icon.textContent = '📄';
    }
    nodeContentWrapper.appendChild(icon);
    // Add node name with required class for search
    const nameSpan = document.createElement('span');
    nameSpan.classList.add('treeview-node-text', 'custom-name');
    nameSpan.textContent = nodeData.name;
    nodeContentWrapper.appendChild(nameSpan);
    // Add status indicator if present
    if (nodeData.status) {
      const status = document.createElement('span');
      status.classList.add('custom-status');
      status.textContent = ` [${nodeData.status}]`;
      nodeContentWrapper.appendChild(status);
    }
  }
});
When implementing custom rendering, keep these points in mind: Clear the nodeContentWrapper.innerHTML at the start of your function to prevent duplicate content when using setData. Always include the ‘treeview-node-text’ class on the span containing searchable text to maintain search functionality. The library automatically adds the expander icon, so you don’t need to create it in your custom renderer.
7. You can then interact with the tree programmatically after it’s initialized:
setData(newData): Updates the treeview with a new data array, completely re-rendering it.getSelectedNodes(): Returns an array containing the data objects of all currently selected nodes.getSelectedNodesAndChildrenValues(key): Returns an array of values for a specifickeyfrom all selected nodes and their descendants.selectNodeById(id, shouldSelect): Programmatically selects (true) or deselects (false) a specific node by its uniqueid.search(searchTerm): Programmatically performs a search on the treeview.setData(newData): Updates the treeview with a new data array, completely re-rendering it.getSelectedNodes(): Returns an array containing the data objects of all currently selected nodes.getSelectedNodesAndChildrenValues(key): Returns an array of values for a specifickeyfrom all selected nodes and their descendants.selectNodeById(id, shouldSelect): Programmatically selects (true) or deselects (false) a specific node by its uniqueid.search(searchTerm): Programmatically performs a search on the treeview.
FAQs
Q: Can I use Quercus.js with dynamically loaded data?
A: Yes, the setData method exists specifically for this use case. Call it whenever you receive new data from an API or need to update the tree based on user actions. Keep in mind that setData clears the current selection state, so you’ll need to restore selections programmatically if that’s required for your application.
Q: How do I handle very large trees with thousands of nodes?
A: Quercus.js renders the entire tree into the DOM on initialization, which can impact performance with extremely large datasets. For trees with more than a few hundred nodes, consider implementing server-side filtering or pagination before passing data to the library. Starting with initiallyExpanded set to false helps initial render performance by keeping most nodes collapsed.
Q: How can I persist the expanded and collapsed state across page reloads?
A: The library doesn’t include built-in persistence, but you can implement this by storing expanded node IDs in localStorage or your backend. Track expansion state changes by monitoring click events on expander elements, save the state, and programmatically expand nodes after initialization by traversing the tree and setting the appropriate classes and styles on parent nodes based on your stored state.
Q: Can I disable the expand and collapse animation?
A: The animation behavior is controlled through CSS transitions on the nested ul elements. You can disable animations by overriding the transition property in your custom stylesheet, setting it to ‘none’ on the relevant elements. This gives you control over animation duration or completely removes the animation effect if that better suits your interface requirements.
Related Resources:
See Also:
 Multi-Select Box With Tree Structured Data Dropdown List – Treeselect
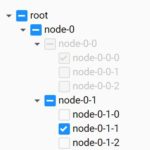 Dynamic Interactive Tree View With Checkboxes – Treejs
 Render JSON Data As A Tree View – json-view
 Modern File Tree Web Component with Async Loading – file-tree
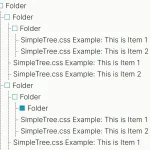 Pure CSS Collapsible Tree View – SimpleTree.css
 Visualize JSON Data Like A Pro With JSONTree.js
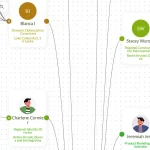 Build Interactive Organization Charts with treeSpider JavaScript Library
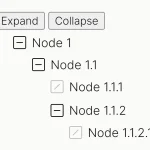 Interactive Tree Structure for Hierarchical Data – Plain Tree