


Driver.js is a lightweight yet powerful JavaScript library to create an animated, interactive, user-friendly visual guide for any web elements.
Features:
- With or without animations.
- With or without background overlay.
- Highlights web elements when the guide is active.
- Popover style step-by-step guide.
Basic usage:
1. Installation.
# Yarn
$ yarn add driver.js
# NPM
$ npm install driver.js --save
2. Import the Driver.js.
<link rel="stylesheet" href="/path/to/dist/driver.min.css">
<script src="/path/to/dist/driver.min.js"></script>
// OR as an ES module
import { driver } from "driver.js";
import "driver.js/dist/driver.css";
3. Create new Driver instance and we’re ready to go.
// required if using UMD mode
const driver = window.driver.js.driver;
// initialize driver.js
const driverObj = driver();
4. Highlight a specific element within the document.
driverObj..highlight({
  element: "#element",
  popover: {
    title: "Popover Title",
    description: "Description"
  }
});
5. Create a step-by-step guided tour.
const driverObj = driver({
  showProgress: true,
  steps: [
    {
      element: '#element 1',
      popover: {
        title: 'Step 1',
        description: 'Description 1',
        side: "left",
        align: 'start'
    }},
    {
      element: '#element 2',
      popover: {
        title: 'Step 2',
        description: 'Description 2',
        side: "right",
        align: 'start'
    }},
    // ...
  ]
});
// start the guide
driverObj.start();
6. All possible options for the Driver.js.
const driverObj = driver({
  // Array of steps to highlight. You should pass
  // this when you want to setup a product tour.
  steps?: DriveStep[];
  // Whether to animate the product tour. (default: true)
  animate?: boolean;
  // Overlay color. (default: black)
  // This is useful when you have a dark background
  // and want to highlight elements with a light
  // background color.
  overlayColor?: string;
  // Whether to smooth scroll to the highlighted element. (default: false)
  smoothScroll?: boolean;
  // Whether to allow closing the popover by clicking on the backdrop. (default: true)
  allowClose?: boolean;
  // Opacity of the backdrop. (default: 0.5)
  overlayOpacity?: number;
  // Distance between the highlighted element and the cutout. (default: 10)
  stagePadding?: number;
  // Radius of the cutout around the highlighted element. (default: 5)
  stageRadius?: number;
  // Whether to allow keyboard navigation. (default: true)
  allowKeyboardControl?: boolean;
  // Whether to disable interaction with the highlighted element. (default: false)
  disableActiveInteraction?: boolean;
  // If you want to add custom class to the popover
  popoverClass?: string;
  // Distance between the popover and the highlighted element. (default: 10)
  popoverOffset?: number;
  // Array of buttons to show in the popover. Defaults to ["next", "previous", "close"]
  // for product tours and [] for single element highlighting.
  showButtons?: AllowedButtons[];
  // Array of buttons to disable. This is useful when you want to show some of the
  // buttons, but disable some of them.
  disableButtons?: AllowedButtons[];
  // Whether to show the progress text in popover. (default: false)
  showProgress?: boolean;
  // Template for the progress text. You can use the following placeholders in the template:
  //  - {{current}}: The current step number
  //  - {{total}}: Total number of steps
  progressText?: string;
  // Text to show in the buttons. `doneBtnText`
  // is used on the last step of a tour.
  nextBtnText?: string;
  prevBtnText?: string;
  doneBtnText?: string;
  // Called after the popover is rendered.
  // PopoverDOM is an object with references to
  // the popover DOM elements such as buttons
  // title, descriptions, body, container etc.
  onPopoverRender?: (popover: PopoverDOM, options: { config: Config; state: State }) => void;
  // Hooks to run before and after highlighting
  // each step. Each hook receives the following
  // parameters:
  //   - element: The target DOM element of the step
  //   - step: The step object configured for the step
  //   - options.config: The current configuration options
  //   - options.state: The current state of the driver
  onHighlightStarted?: (element?: Element, step: DriveStep, options: { config: Config; state: State }) => void;;
  onHighlighted?: (element?: Element, step: DriveStep, options: { config: Config; state: State }) => void;;
  onDeselected?: (element?: Element, step: DriveStep, options: { config: Config; state: State }) => void;;
  // Hooks to run before and after the driver
  // is destroyed. Each hook receives
  // the following parameters:
  //   - element: Currently active element
  //   - step: The step object configured for the currently active
  //   - options.config: The current configuration options
  //   - options.state: The current state of the driver
  onDestroyStarted?: (element?: Element, step: DriveStep, options: { config: Config; state: State }) => void;;
  onDestroyed?: (element?: Element, step: DriveStep, options: { config: Config; state: State }) => void;;
  // Hooks to run on button clicks. Each hook receives
  // the following parameters:
  //   - element: The current DOM element of the step
  //   - step: The step object configured for the step
  //   - options.config: The current configuration options
  //   - options.state: The current state of the driver
  onNextClick?: (element?: Element, step: DriveStep, options: { config: Config; state: State }) => void;;
  onPrevClick?: (element?: Element, step: DriveStep, options: { config: Config; state: State }) => void;;
  onCloseClick?: (element?: Element, step: DriveStep, options: { config: Config; state: State }) => void;;
});
7. Available options for steps.
{
  // The target element to highlight.
  // This can be a DOM element, or a CSS selector.
  // If this is a selector, the first matching
  // element will be highlighted.
  element: Element | string;
  // The popover configuration for this step.
  // Look at the Popover Configuration section
  popover?: Popover;
  // Callback when the current step is deselected,
  // about to be highlighted or highlighted.
  // Each callback receives the following parameters:
  //   - element: The current DOM element of the step
  //   - step: The step object configured for the step
  //   - options.config: The current configuration options
  //   - options.state: The current state of the driver
  onDeselected?: (element?: Element, step: DriveStep, options: { config: Config; state: State }) => void;
  onHighlightStarted?: (element?: Element, step: DriveStep, options: { config: Config; state: State }) => void;
  onHighlighted?: (element?: Element, step: DriveStep, options: { config: Config; state: State }) => void;
}
8. Available popover options.
{
  // Title and descriptions shown in the popover.
  // You can use HTML in these. Also, you can
  // omit one of these to show only the other.
  title?: string;
  description?: string;
  // The position and alignment of the popover
  // relative to the target element.
  side?: "top" | "right" | "bottom" | "left";
  align?: "start" | "center" | "end";
  // Array of buttons to show in the popover.
  // When highlighting a single element, there
  // are no buttons by default. When showing
  // a tour, the default buttons are "next",
  // "previous" and "close".
  showButtons?: ("next" | "previous" | "close")[];
  // An array of buttons to disable. This is
  // useful when you want to show some of the
  // buttons, but disable some of them.
  disableButtons?: ("next" | "previous" | "close")[];
  // Text to show in the buttons. `doneBtnText`
  // is used on the last step of a tour.
  nextBtnText?: string;
  prevBtnText?: string;
  doneBtnText?: string;
  // Whether to show the progress text in popover.
  showProgress?: boolean;
  // Template for the progress text. You can use
  // the following placeholders in the template:
  //   - {{current}}: The current step number
  //   - {{total}}: Total number of steps
  // Defaults to following if `showProgress` is true:
  //   - "{{current}} of {{total}}"
  progressText?: string;
  // Custom class to add to the popover element.
  // This can be used to style the popover.
  popoverClass?: string;
  // Hook to run after the popover is rendered.
  // You can modify the popover element here.
  // Parameter is an object with references to
  // the popover DOM elements such as buttons
  // title, descriptions, body, etc.
  onPopoverRender?: (popover: PopoverDOM, options: { config: Config; state: State }) => void;
  // Callbacks for button clicks. You can use
  // these to add custom behavior to the buttons.
  // Each callback receives the following parameters:
  //   - element: The current DOM element of the step
  //   - step: The step object configured for the step
  //   - options.config: The current configuration options
  //   - options.state: The current state of the driver
  onNextClick?: (element?: Element, step: DriveStep, options: { config: Config; state: State }) => void
  onPrevClick?: (element?: Element, step: DriveStep, options: { config: Config; state: State }) => void
  onCloseClick?: (element?: Element, step: DriveStep, options: { config: Config; state: State }) => void
}
9. API methods.
// Start the tour using `steps` given in the configuration
driverObj.drive();  // Starts at step 0
driverObj.drive(4); // Starts at step 4
driverObj.moveNext(); // Move to the next step
driverObj.movePrevious(); // Move to the previous step
driverObj.moveTo(4); // Move to the step 4
driverObj.hasNextStep(); // Is there a next step
driverObj.hasPreviousStep() // Is there a previous step
driverObj.isFirstStep(); // Is the current step the first step
driverObj.isLastStep(); // Is the current step the last step
driverObj.getActiveIndex(); // Gets the active step index
driverObj.getActiveStep(); // Gets the active step configuration
driverObj.getPreviousStep(); // Gets the previous step configuration
driverObj.getActiveElement(); // Gets the active HTML element
driverObj.getPreviousElement(); // Gets the previous HTML element
// Is the tour or highlight currently active
driverObj.isActive();
// Recalculate and redraw the highlight
driverObj.refresh();
// Look at the configuration section for configuration options
// https://driverjs.com/docs/configuration#driver-configuration
driverObj.getConfig();
driverObj.setConfig({ /* ... */ });
driverObj.setSteps([ /* ... */ ]); // Set the steps
// Look at the state section of configuration for format of the state
// https://driverjs.com/docs/configuration#state
driverObj.getState();
// Look at the DriveStep section of configuration for format of the step
// https://driverjs.com/docs/configuration/#drive-step-configuration
driverObj.highlight({ /* ... */ }); // Highlight an element
Changelog:
v1.5.0 (06/24/2026)
- Add done-btn class to next button
- Pass final state to onDestroyed hook
- Keep tour open on arrow-left at step 1
- Remove button text-shadow ghost text
- Fire onNextClick on overlay nextStep
- Add getNextStep to the driver API
- Remove unicode characters from buttons
v1.4.0 (11/19/2025)
- overlayClickBehavior now supports callbacks
v1.3.6 (05/13/2025)
- Bugfixes
v1.3.4 (02/02/2025)
- Bugfixes
v1.3.1 (11/11/2023)
- Update
v1.3.0 (09/11/2023)
- Update vite configuration to support ES2019
- Popover title to support HTML
- Fixes wrong type definition for onPopoverRender configuration
- Add validation on class name
- Upgrade all the dependencies to latest
v1.2.0 (07/24/2023)
- Adds new disableActiveInteraction config to disable interaction with the active element.
- Bugfixes
v1.1.0 (07/24/2023)
- Implemented focus trapping
- Adds ARIA attributes and use of semantic markup.
v1.0.3 (07/07/2023)
- Rewritten in TypeScript.
- Popover is much more intelligent in its placement
- Supports async steps to allow more dynamic and interactive guides
- Support for non-element steps (i.e. where you just want to show a popup on screen)
- Ask for confirmation before exit
- Support for scrollable elements
- Allows showing progress during product tours
- More customizable than ever with more hooks
- Improved documentation with code samples for usage
- Popover hooks allow you to have more control over the popover rendering
v0.9.8 (03/21/2020)
- Resolve merge conflicts
v0.9.8 (02/29/2020)
- Adds step counter feature
v0.9.7 (06/15/2019)
- Updates Dependencies
v0.9.6 (06/01/2019)
- Fix touch issue
- Error when hiding on an element without popover
v0.9.3 (02/24/2019)
- Update
v0.9.2 (02/10/2019)
- Add more options
- Doc updated
v0.7.1 (10/12/2018)
- Add more options
- Optimize
v0.6.0 (06/30/2018)
- Add support for asynchronous actions
v0.5.2 (05/23/2018)
- Add keyboardControl option and typo in readme
See Also:
 Form Wizard UI With Step Navigation – Wizard-JS
 Create A Multi-Step Form In Bootstrap 5 – Enchanter
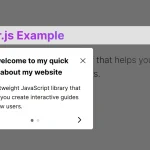 Create Interactive Web App Tours in Under 10KB – GTourJS
 Create Interactive Guided Tours In App – TourGuide.js
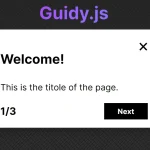 Creating Interactive Step-by-step User Guides with Guidy.js
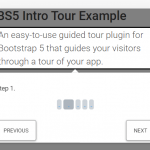 Easy Guided Tour Plugin For Bootstrap 5 – bs5-intro-tour
 Interactive Wizard UI Using Bootstrap 5 Tabs Component
 Linear Step-by-Step Flow – Bootstrap Steps